


If you’ve ever dealt with a dripping drain cabinet or a gurgling sink, you already know how frustrating poor plumbing can be. Knowing how to install a kitchen sink drain pipe is one of the most valuable DIY skills a homeowner can have — and it’s far more approachable than most people think.
Whether you’re replacing a corroded old assembly, fitting out a brand-new sink, or simply tackling a weekend renovation project, this step-by-step guide will show you exactly how to install a kitchen sink drain pipe from the ground up. You’ll learn which parts you need, how to hook up a sink drain correctly, and the exact order to assemble everything so you end up with a clean, leak-free result.
No plumber required. Let’s walk through it together.
What You Need Before You Install a Kitchen Sink Drain Pipe
Before you start plumbing a sink drain, take five minutes to gather your tools and parts. Having everything within reach before you begin means you won’t be making emergency hardware runs with water all over your cabinet floor.
Tools You’ll Need
- Adjustable pliers or slip-joint pliers
- Pipe wrench
- Hacksaw or PVC pipe cutter
- Tape measure
- Bucket and old towels
- Plumber’s putty or silicone sealant
- Teflon tape (plumber’s tape)
- Utility knife or deburring tool
Parts Required to Install Kitchen Sink Drain Plumbing
- Drain basket / strainer assembly
- Drain tailpiece (standard 1-1/2 inch diameter)
- P-trap with slip-joint fittings
- Trap arm (horizontal extension pipe)
- Extension tubes (if needed for added length)
- Drain elbow connector
- Wall or floor drain inlet fitting
- Slip-joint washers and nuts
Most U.S. hardware stores carry complete kitchen sink drain plumbing starter kits for $15–$40. These kits bundle the tailpiece, P-trap, trap arm, and all necessary fittings in one box — a smart buy if you want guaranteed compatibility. Buying a kit also ensures that when you go to install kitchen sink drain plumbing, the pipe diameters all match up right away.
Step 1: Remove the Old Drain Pipe Assembly
If you’re replacing an existing setup rather than working on a brand-new sink, start with removal. Clearing out the old components is the foundation of any successful kitchen sink drain pipe installation.
Begin by shutting off both the hot and cold water supply valves under the sink. Even though the drain itself doesn’t carry pressurized water, working in a dry cabinet is far easier. Place a bucket directly under the P-trap — there’s always water sitting in the curve and you don’t want it on your cabinet floor.
Loosen the slip-joint nuts by hand first, then use pliers if needed. Work from the trap arm at the wall back toward the drain basket, dismantling the assembly piece by piece. Once the P-trap is free, unscrew the drain basket locknut from below using a drain wrench or channel-lock pliers. Push the old basket up and out through the sink opening.
Wipe the drain hole completely clean with a damp cloth. Leftover putty, old gasket material, or mineral deposits will prevent your new drain basket from sealing properly — so take the time to get the surface spotless before moving on.
Step 2: Install the New Drain Basket — The Start of How to Plumb a Sink
The drain basket is the chrome or stainless strainer piece that sits flush in the sink opening. It’s the anchor point for the entire drain system, so getting a watertight seal here is non-negotiable when you install a kitchen sink drain pipe.
Roll a pencil-thick rope of plumber’s putty and press it firmly around the underside rim of the basket. If your drain kit comes with a rubber gasket, use that instead — it’s cleaner and works just as well, especially on composite or acrylic sinks where putty can stain.
Lower the basket into the drain opening from above. From below the sink, thread on the rubber gasket, the friction ring, and then the plastic locknut — in that order. Hand-tighten the locknut as far as it will go, then use a wrench to snug it down firmly while holding the basket from above to stop it from spinning.
Wipe away any putty that squeezes out around the rim. Your basket should sit perfectly flush with the sink surface. A basket that rocks or gaps will cause leaks no matter how well the rest of your sink drain pipe installation goes.
Step 3: Attach the Drain Tailpiece — Key to How to Assemble a Sink Drain
The drain tailpiece is the straight vertical pipe that drops down from the basket outlet. It’s the first pipe in the drainage chain and a critical component when learning how to assemble a sink drain properly.
Thread the tailpiece onto the drain basket outlet using a slip-joint nut and a beveled washer. Make sure the tapered side of the washer faces downward, toward the tailpiece — this is what creates the compression seal. Skip the Teflon tape on this connection; slip-joint fittings seal via washer compression, not thread sealant.
Hold the tailpiece up next to the P-trap before cutting anything. You want to estimate the finished length so that when the P-trap is connected, the whole assembly lines up with the wall drain inlet without bending or forcing any pipe. Mark the tailpiece, cut it cleanly with a hacksaw, and smooth the cut edge with a file or sandpaper to remove burrs.
Getting the tailpiece length right at this stage makes the rest of the kitchen sink drain pipe assembly fall into place naturally. Cut it too short and you’ll create gaps; leave it too long and the P-trap won’t sit at the correct angle for proper drainage.
Step 4: Connect the P-Trap — The Heart of Kitchen Sink Drain Plumbing
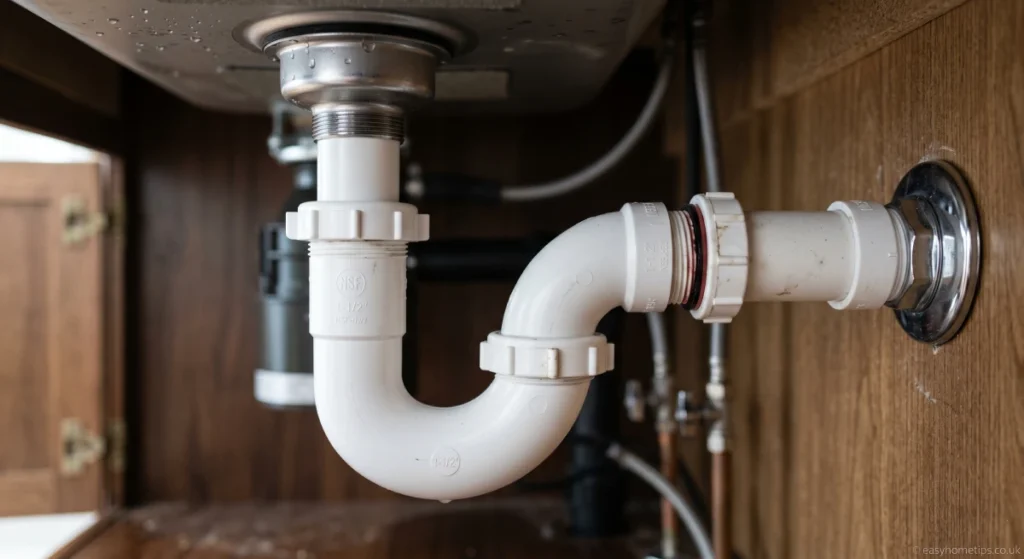
This setup ensures smooth drainage and prevents foul odors from entering your kitchen.
The P-trap is arguably the most important component in the entire kitchen sink drain plumbing setup. That curved section of pipe holds a small pool of water at all times, and that water seal is what physically blocks sewer gases from rising up through your drain and into your kitchen. Every properly installed kitchen sink drain pipe must include a functioning P-trap.
Slide the slip-joint nut onto the bottom of the tailpiece with the threads facing downward. Position the P-trap so the open top aligns with the tailpiece and the outlet end points horizontally toward the wall drain stub-out. Push the trap up onto the tailpiece and hand-tighten the slip nut.
On the wall side, connect the trap arm — the horizontal pipe section — to the wall drain inlet using a second slip nut and washer. This is the part of how to hook up a sink drain that trips up most beginners. The trap arm needs a slight downward pitch — roughly 1/4 inch drop per foot of horizontal run — so that water flows naturally toward the wall and doesn’t pool in the pipe.
If the trap arm falls short of the wall fitting, add an extension tube. If it’s too long, cut it down. When you install kitchen sink drain plumbing in a double-basin sink, you’ll use a center tee fitting instead of a simple trap arm, but the same slope rule applies to both sides.
Step 5: Verify Alignment — A Critical Step in How to Plumb a Sink Drain
Before you lock anything down permanently, this is your moment to audit the full installation. A proper kitchen sink drain pipe run should look clean and logical from the basket all the way to the wall — no kinked pipes, no forced angles, no joints under stress.
Check these four things:
- All connections align freely — no pipe should be pulled or pushed into place
- The P-trap curve points downward — never sideways or upward
- The trap arm slopes toward the wall — water must flow downhill, not uphill
- No pipe is under lateral stress — forced connections crack and leak over time
Once the layout looks right, tighten each slip-joint nut firmly by hand, then add a controlled half-turn with pliers. Resist the urge to crank them tight — PVC fittings are designed to seal under moderate compression, and overtightening cracks the fitting or deforms the washer. Either way, you’ll be back under the sink fixing a drip.
For any threaded connections — like the tailpiece threading into the basket — wrap two or three layers of Teflon tape clockwise around the threads before assembly. This helps create a proper thread seal and makes future disassembly much easier.
Proper alignment at this stage is what separates a professional-looking install kitchen sink drain plumbing job from one that leaks within a week.
Step 6: Test for Leaks — The Final Proof When You Install a Kitchen Sink Drain Pipe
The moment of truth has arrived. Turn both water supply valves back on and run the hot and cold taps at full pressure for a solid minute. While the water flows, get down under the sink and inspect every joint in the kitchen sink drain pipe assembly.
Check each connection point methodically:
- Around the drain basket rim at the sink surface
- At the tailpiece slip nut just below the basket
- At the top and bottom of the P-trap curve
- Where the trap arm meets the wall inlet
Run a dry finger around each joint. Even a tiny drip will show up as a wet ring on your fingertip. If you find a drip, don’t stress — turn off the water, dry the joint thoroughly, and check whether the slip nut needs another quarter-turn or whether the washer got pinched out of position during assembly.
Once the slow-flow test passes, do a flood test: fill the sink completely with water, then yank the stopper. The sudden surge of water puts your kitchen sink drain pipe installation under real-world pressure and exposes any weak points that a trickle might miss. Watch every joint as the water rushes through.
If everything stays bone dry — congratulations. You’ve just successfully completed a full how to install a kitchen sink drain pipe project from scratch.
Pro Tips for a Better Kitchen Sink Drain Pipe Installation
Even when you know the basics of how to install a kitchen sink drain pipe, a few insider tips can make the difference between a job that lasts five years and one that lasts twenty.
Choose plastic pipe over metal when you can. PVC and ABS drain pipes are lightweight, easy to cut, and completely corrosion-resistant. Chrome or brass pipes look polished but corrode from the inside out and are significantly harder to cut and seat properly. For the drain runs under your sink — where nobody sees them — plastic is the smarter choice every time.
Don’t overdo the sealant. Plumber’s putty or silicone belongs on the drain basket rim only. Slip-joint connections are designed to seal via compression washers — packing sealant into those joints doesn’t improve the seal and makes future repairs a nightmare when you need to install kitchen sink drain plumbing repairs down the road.
Know your local plumbing code. Across the U.S., local building codes regulate the maximum distance between a P-trap and the wall drain inlet, minimum pipe slopes, and venting requirements. A quick call to your local building department before you start can save you from having to tear everything out and redo it. In some jurisdictions, even a simple kitchen sink drain pipe replacement may need a rough-in inspection.
Keep spare washers in your toolkit. Slip-joint washers harden and shrink over time, causing slow drips that appear months after you install a kitchen sink drain pipe. Keeping a small bag of 1-1/2-inch slip-joint washers costs about $3 and saves you a full disassembly next time a joint starts weeping.
FAQ: How to Install a Kitchen Sink Drain Pipe
How long does it take to install a kitchen sink drain pipe?
For a homeowner with basic DIY confidence, a standard kitchen sink drain pipe installation typically takes 1 to 2 hours. If you’re dealing with an old corroded assembly, non-standard pipe distances, or a double-basin sink, plan for 2 to 3 hours. Having all parts ready before you install a kitchen sink drain pipe cuts the time significantly.
Do I need a permit to install kitchen sink drain plumbing?
For a straightforward replacement using the same drain location, most U.S. municipalities don’t require a permit. But if your project involves moving the drain, adding new drain lines inside walls, or changing the plumbing layout, you’ll likely need one. Always verify with your local building department before you begin any install kitchen sink drain plumbing project that goes beyond the cabinet space.
What size pipe do I need when I install a kitchen sink drain pipe?
The U.S. standard for kitchen sink drain pipe components is 1-1/2 inches in diameter — this covers the tailpiece, P-trap, and trap arm. The wall drain stub-out is also typically 1-1/2 inches. If you have a double sink with a garbage disposal, your drain configuration may vary slightly, but 1-1/2 inch remains the baseline standard for residential kitchen sink drain plumbing.
Why does my kitchen smell bad after I install the sink drain pipe?
Sewer odors after a kitchen sink drain pipe installation almost always trace back to one of two problems. Either the P-trap isn’t holding a water seal — meaning it was installed at the wrong angle — or the drain basket gasket isn’t sealing fully, allowing gas to rise around the rim. Check the P-trap orientation first, then re-examine the basket seal.
Can I install a kitchen sink drain pipe without plumber’s putty?
Absolutely. Many drain kits include a rubber gasket that eliminates the need for putty entirely. Silicone sealant is another solid option, though it bonds more permanently and makes future drain removal harder. If you have an acrylic, composite, or solid surface sink, skip the putty completely when you install a kitchen sink drain pipe — putty can chemically stain and degrade those materials over time.
Conclusion: You Now Know How to Install a Kitchen Sink Drain Pipe
Getting to grips with how to install a kitchen sink drain pipe puts one of the most common household plumbing repairs firmly in your own hands. No scheduling a plumber, no waiting for an appointment, and no service call bill at the end of the day.
To recap: remove the old assembly cleanly, seat the new drain basket with a solid putty or gasket seal, attach the tailpiece at the right length, connect the P-trap with the correct downward slope, verify alignment across the full run, and test everything under real water pressure before calling it done. Follow those six steps in order and you’ll have a solid, leak-free kitchen sink drain pipe that holds up for years.
Ready to tackle this yourself? Grab a drain kit from your local hardware store, clear out the cabinet, and block off a couple of hours this weekend. Knowing how to install a kitchen sink drain pipe is a skill that pays for itself every single time a drain needs attention — and the confidence it builds carries over into every future home project you take on.
Have questions about your specific setup? Drop them in the comments below — we read every one.
This guide covers standard residential kitchen sink drain pipe installations using PVC or ABS materials. For older cast iron drain systems, work inside wall cavities, or any configuration requiring new venting, consult a licensed plumber in your area.


