


Tired of smoky kitchens, greasy ceilings, and lingering cooking odors every time you fire up the stove? You’re not alone — and the fix might be simpler than you think.
Learning how to install kitchen hood the right way can completely transform your cooking space. It clears the air, protects your cabinets, and even adds a sleek, professional look to your kitchen.
The good news? Most homeowners across the USA can handle kitchen hood installation as a weekend DIY project — no contractor required. In this ultimate guide, we’ll walk you through every step, from planning your ductwork to making the final electrical connection.
Let’s get your kitchen breathing clean again.
1. Understanding Kitchen Hood Types Before You Begin
Before you even pick up a drill, you need to understand what kind of hood you’re working with. Not all hoods are the same, and choosing the wrong type for your kitchen layout will cause headaches down the road.
There are two main categories in kitchen hood installation:
- Ducted (Vented) Hoods — These push air outside through a duct system. They’re more effective at removing grease, heat, and odors permanently.
- Ductless (Recirculating) Hoods — These filter air through charcoal filters and push it back into the kitchen. Easier to install but less powerful.
Then there are sub-types based on mounting style:
- Under-cabinet range hoods — mounted below kitchen cabinets directly above the stove
- Wall-mount range hoods — mounted directly on the wall without cabinets above
- Island range hoods — suspended from the ceiling over a kitchen island
- Over-the-range microwave hoods — combination appliances that serve as both a microwave and ventilation unit
Understanding which type you have will determine your range hood duct installation path and what tools you’ll need. Always check your hood’s manual and confirm your kitchen’s layout before purchasing materials.
2. Tools and Materials You’ll Need
Having the right tools ready before you start is one of the smartest moves you can make. Nothing slows down a project like running back to the hardware store mid-install.
Essential tools:
- Power drill with bits
- Stud finder
- Measuring tape
- Level
- Jigsaw or hole saw
- Wire stripper
- Voltage tester
- Screwdrivers (flat and Phillips)
- Pencil and painter’s tape
Materials:
- Range hood unit
- Duct (typically 6-inch or 7-inch round or rectangular)
- Duct connectors and elbows
- Duct tape (foil-type, not standard cloth tape)
- Mounting screws and anchors
- Wire nuts
- Electrical box (if not pre-existing)
Buying quality materials upfront ensures your how to install a exhaust hood project runs smoothly from start to finish. Don’t skimp on duct tape — foil tape creates airtight seals that cloth tape simply can’t match.
3. Planning Your Ductwork Route
This is the step most beginners skip — and then regret. Range hood duct installation requires a clear, efficient path from your hood to the outside of your home.
The best duct route is the shortest and most direct path to an exterior wall or roof cap. Every bend in the duct reduces airflow efficiency by roughly 20–25%, so fewer turns mean better performance.
Key planning tips:
- Measure twice, cut once — mark your entire duct path on walls and ceiling before cutting anything
- Avoid running ducts through unconditioned attic spaces if possible (condensation issues)
- Use rigid metal duct over flexible duct for better airflow and longevity
- Keep the total duct run under 25 feet for optimal performance
If you’re converting from a ductless to a vented system during a changing range hood project, you’ll need to cut through an exterior wall or ceiling — this may require a permit depending on your local building codes. Always check with your local municipality first.
4. Turning Off Power and Preparing the Space
Safety is non-negotiable. Before doing anything electrical, go to your breaker box and switch off the circuit that powers your kitchen exhaust or the outlet near your hood’s location.
Use a non-contact voltage tester to confirm the power is off before touching any wires. Never skip this step — even experienced electricians double-check.
Preparation checklist:
- Clear the stovetop and surrounding area
- Remove old hood or microwave (if replacing)
- Clean the wall/cabinet area where the new hood will mount
- Locate wall studs using a stud finder and mark them with painter’s tape
- Check that your electrical circuit can handle the hood’s amperage (most standard hoods need a 15-amp or 20-amp dedicated circuit)
If you’re replacing a unit while changing range hood styles (e.g., from under-cabinet to wall-mount), you may need to patch cabinet holes or add a new mounting structure. Plan this step carefully.
5. Mounting the Range Hood — Step by Step
Now comes the most hands-on part of how to install kitchen hood. Follow this sequence carefully for a clean, secure installation.
Step 1: Mark the Mounting Position
Measure the height from the cooking surface to the bottom of the hood. Standard installation height is 24–30 inches above electric stoves and 27–36 inches above gas stoves. Mark this height on the wall.
Step 2: Mark and Cut the Duct Opening
Using your duct size as a guide, trace the opening onto the wall or cabinet bottom. Cut carefully with a jigsaw or hole saw.
Step 3: Attach the Mounting Bracket
Most hoods come with a mounting bracket or template. Screw the bracket into wall studs — never just into drywall. Use a level to ensure it’s perfectly straight.
Step 4: Lift and Secure the Hood
This step is much easier with a helper. Lift the hood onto the bracket and temporarily secure it. Double-check alignment with a level before driving all screws home.
Step 5: Connect the Ductwork
Slide your duct section up through the hood’s duct opening and connect it to the duct run you planned in Step 3. Use foil tape at every connection point to seal gaps completely.
6. How to Install Range Hood Exhaust Duct — The Right Way
Getting how to install range hood exhaust ductwork right is the difference between a system that works for years and one that leaks grease-laden air into your walls.
Follow these best practices:
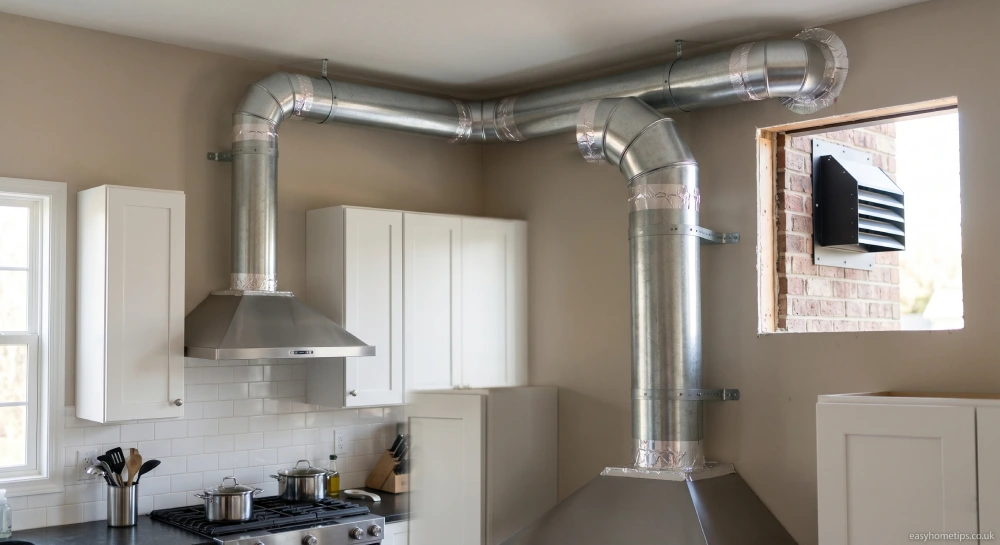
- Use rigid galvanized duct whenever possible — it’s more durable and easier to clean than flexible duct
- Seal every joint with foil tape — don’t rely on screws alone
- Install a backdraft damper at the exterior vent cap — this prevents cold air, insects, and moisture from entering when the hood is off
- Use the shortest, straightest route possible — every elbow adds resistance and reduces CFM (cubic feet per minute) airflow
- Vent to the outside only — never vent into an attic, crawl space, or wall cavity
If your home is older and doesn’t have a pre-existing duct opening, you’ll need to cut through the exterior wall. Use a hole saw sized to your duct diameter, and always insulate around the duct where it passes through exterior walls to prevent condensation.
7. Electrical Wiring Connection
Many range hoods come with a standard power cord that plugs into a nearby outlet — making wiring simple. But if your hood requires a hardwired connection, follow these steps carefully.
Hardwiring a range hood:
- Confirm power is off at the breaker
- Run the correct gauge wire to the junction box (usually 14-gauge for 15-amp circuits, 12-gauge for 20-amp)
- Strip wire ends approximately ¾ inch
- Connect black (hot) to black, white (neutral) to white, and green or bare copper (ground) to ground
- Secure all connections with wire nuts and wrap with electrical tape
- Tuck wires neatly into the junction box
- Restore power and test
If you’re unsure about any part of the wiring process during your how to install a exhaust hood project, hiring a licensed electrician for just this step is a smart investment — it keeps you safe and ensures your installation passes inspection.
8. DIY vs. Professional Installation — Which Is Right for You?
| Factor | DIY Installation | Professional Installation |
|---|---|---|
| Average Cost | 200 (materials only) | 500+ (labor + materials) |
| Time Required | 3–6 hours | 1–3 hours |
| Skill Level Needed | Moderate | None (for homeowner) |
| Ductwork Complexity | Simple routes only | Complex routing possible |
| Electrical Work | Basic plug-in or basic hardwire | Complex or panel upgrades |
| Permit Required | Sometimes | Contractor handles it |
| Warranty Risk | Possible void if done wrong | Fully preserved |
| Best For | Confident DIYers | First-timers, complex installs |
Most standard kitchen hood installation projects in the USA are well within DIY reach. However, if your home has complex ductwork routing, older electrical panels, or requires permits, a licensed contractor is money well spent.
9. Testing, Finishing, and Maintenance Tips
You’ve done the hard work — now it’s time to make sure everything works perfectly and set yourself up for long-term success.
Testing your new hood:
- Restore power at the breaker
- Turn the hood on at its lowest speed setting first
- Hold a piece of tissue near the hood intake — it should pull toward the hood firmly
- Check all duct joints for air leaks (you can feel them with your hand or use a candle flame)
- Test all fan speed settings and the hood light
Finishing touches:
- Caulk around the exterior vent cap to weatherproof it
- Touch up any wall paint around the mounting area
- Clean any fingerprints from the hood surface with a microfiber cloth
Ongoing maintenance:
- Clean grease filters monthly — most are dishwasher safe
- Replace charcoal filters every 3–6 months (ductless hoods only)
- Wipe down the exterior weekly with a degreaser spray
- Check duct joints annually for any loosening or tape failure
Proper maintenance after how to install kitchen hood is complete will extend your unit’s lifespan by years and keep your kitchen air clean every single day.
Internal Linking Opportunities
Suggested internal links to add when publishing:
- “Best Range Hoods for Small Kitchens” → Anchor: “choosing the right kitchen hood”
- “Kitchen Ventilation Guide: CFM Explained” → Anchor: “CFM airflow requirements”
- “How to Replace a Kitchen Exhaust Fan” → Anchor: “changing range hood fans”
- “Kitchen Remodel Cost Breakdown” → Anchor: “kitchen hood installation cost”
- “How to Clean Range Hood Filters” → Anchor: “grease filter maintenance”
Frequently Asked Questions (FAQ)
Q1: How hard is it to install a kitchen hood yourself?
Installing a kitchen hood yourself is moderately easy for most handy homeowners. If you’re replacing an existing unit in the same spot with the same duct configuration, it typically takes 2–4 hours. The most challenging parts are routing the ductwork and handling the electrical connection. If you have basic power tools and can follow instructions step-by-step, kitchen hood installation is a very doable weekend project.
Q2: Do I need a permit to install a range hood?
In most US states, replacing a like-for-like range hood doesn’t require a permit. However, if you’re cutting a new hole in an exterior wall, modifying ductwork, or adding new electrical circuits, many municipalities do require a permit. Always check with your local building department before starting your range hood duct installation project to avoid fines or issues when selling your home.
Q3: What height should I install my kitchen hood?
The recommended height for kitchen hood installation is 24–30 inches above electric stoves and 27–36 inches above gas stoves. Installing it too high reduces suction efficiency. Too low creates a fire hazard and practical inconvenience. Always follow the specific manufacturer’s recommendations in your hood’s installation manual, as they may vary slightly between brands and models.
Q4: Can I install a range hood without ductwork?
Yes — ductless (recirculating) range hoods don’t require any ductwork at all. They use charcoal filters to trap grease and odors, then recirculate filtered air back into the kitchen. While they’re much easier to install than vented hoods, they’re significantly less effective at removing heat and moisture. If you want to know how to install a exhaust hood without cutting through walls, a ductless model is your best option.
Q5: How much does it cost to install a kitchen hood in the USA?
DIY kitchen hood installation typically costs 200 for materials (duct, tape, mounting hardware, etc.) plus the cost of the hood itself, which ranges from 1,500+ depending on the brand and style. Professional installation adds 500 in labor costs. Complex installations with new ductwork or electrical work can push total costs to 1,200. Getting at least two quotes from local contractors is always smart before committing.
Conclusion
Installing a kitchen hood doesn’t have to be an intimidating project. With the right tools, a clear plan, and this step-by-step guide, you now have everything you need to tackle how to install kitchen hood with total confidence.
From planning your range hood duct installation route to making the final electrical connection, every step we’ve covered is designed to give you a clean, safe, and high-performing kitchen ventilation system that lasts for years.
The key takeaways? Choose the right hood type for your kitchen, plan your ductwork before cutting anything, always work safely with power off, and seal every duct joint with foil tape.
Your kitchen deserves clean air — and you have the skills to make it happen. Grab your tools, follow these 9 powerful steps, and transform your kitchen this weekend. If you found this guide helpful, share it with a friend who’s planning a kitchen upgrade. And if you have questions, drop them in the comments below — we answer every one.


")

