


Let’s be honest — there’s something really satisfying about fixing something yourself. When you are helping with some repairs at home, you’re not just saving money. You’re building confidence, learning useful skills, and taking real ownership of your space.
Most people assume home repairs are complicated or dangerous. But honestly, a lot of common fixes are totally manageable once you know the basics. Whether it’s a dripping faucet, a squeaky door, or a cracked wall, you are helping with some repairs at home every time you pick up a tool and give it a try.
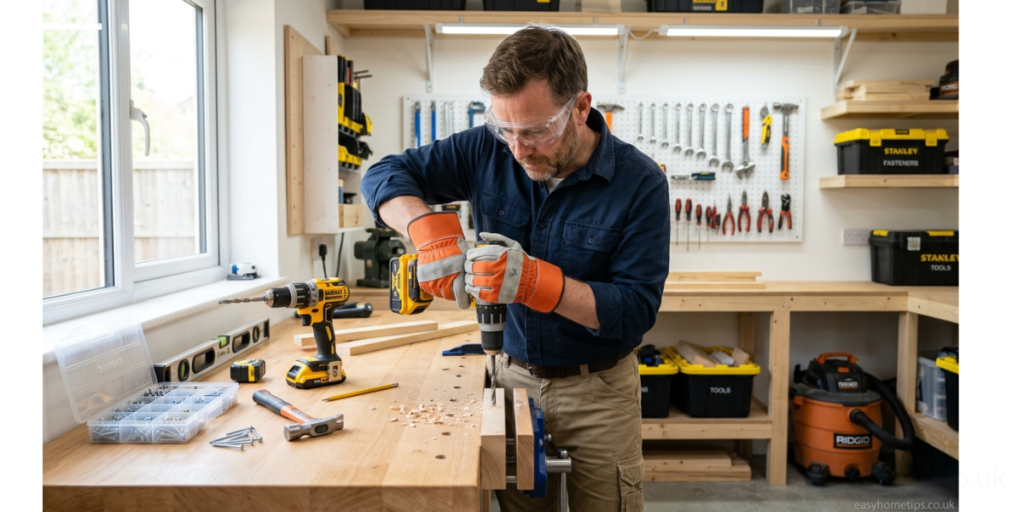
This guide will walk you through everything — from setting up your basic tool kit to tackling common household repairs with ease. It’s written for beginners, so no experience needed.
Getting Your Tools Ready Before You Start

Before you are helping with some repairs at home, you need the right tools. Trying to fix things without proper tools is like cooking without a pan — it just doesn’t work.
Here’s a simple starter home repair toolkit that covers most jobs:
- Hammer – For nails, hanging pictures, or light demolition
- Screwdrivers (flathead and Phillips) – For tightening, removing, or installing screws
- Measuring tape – Always measure before cutting or drilling
- Level – Keeps shelves and frames straight
- Utility knife – Useful for cutting drywall, tape, or caulk
- Adjustable wrench – Great for plumbing jobs
- Cordless drill – A game-changer for mounting and assembling
- Pliers – Needle-nose and regular both come in handy
- Stud finder – Helps you drill into walls safely
- Caulking gun – For sealing gaps around sinks, tubs, and windows
You don’t need to buy everything at once. Start with the basics — a hammer, screwdrivers, measuring tape, and a level will handle a surprising number of jobs.
Organizing Your Tools the Smart Way
Keep your tools in one dedicated place. A simple toolbox or a small wall-mounted pegboard works perfectly. When you are helping with some repairs at home, the last thing you want is spending 20 minutes searching for a screwdriver.
Label your shelves, keep similar tools together, and return everything after each job. It sounds simple, but this habit saves hours over time.
Understanding Common Home Repairs You Can Do Yourself
When you are helping with some repairs at home, it helps to know which repairs are beginner-friendly and which ones need a professional. Here’s a breakdown of the most common DIY home repair tasks people tackle every week.
Patching Holes in Walls

Nail holes, doorknob dents, and small cracks are some of the most common wall repair issues in any home. The fix is easier than you’d think.
What you’ll need: Spackle or wall patching compound, a putty knife, sandpaper, and paint.
Steps:
- Clean the area around the hole
- Apply spackle with the putty knife
- Let it dry completely (usually 2–4 hours)
- Sand it smooth
- Prime and paint to match the wall
For larger holes (bigger than 6 inches), you’ll want a drywall patch kit. These are sold at any hardware store and include step-by-step instructions.
Fixing a Leaky Faucet

A dripping faucet is annoying — and it wastes a surprising amount of water. When you are helping with some repairs at home, a leaky faucet repair is one of the first skills worth learning.
Most faucet leaks happen because of a worn-out washer or O-ring. Replacing these costs less than $5 and takes under an hour.
Basic steps:
- Turn off the water supply under the sink
- Remove the faucet handle (usually one screw underneath)
- Find and replace the washer or O-ring
- Reassemble and test
Always take the old part to the hardware store so you match the size exactly.
Tackling Floor and Door Repairs Like a Pro
Fixing Squeaky Floors

Squeaky floors happen when the subfloor rubs against the joists below. It’s mostly a flooring maintenance issue rather than a structural one — so don’t panic.
For hardwood floors: Sprinkle a little powdered graphite or talcum powder into the gap between the boards. Step on it repeatedly to work it in. This often quiets the squeak immediately.
For carpeted floors: You can drive a short screw through the carpet into the subfloor to tighten things up. Use a screw that’s long enough to grab the joist but short enough not to poke through the other side.
If the squeak is severe, you may need to access it from underneath through the basement or crawl space.
Repairing a Sticky or Squeaky Door
When you are helping with some repairs at home, sticky doors are one of the most frustrating things to deal with. Luckily, most door issues are simple fixes.
Common causes:
- Loose hinges (tighten the screws)
- Paint buildup on edges (sand lightly and repaint)
- Wood swelling from humidity (sand the swollen edge and seal it)
- Misaligned strike plate (adjust with a screwdriver)
Rub a candle or bar of soap along squeaky hinge areas for an instant fix. If the screws are stripped, try filling the hole with a wooden toothpick and a dab of glue, then re-driving the screw.
Plumbing Basics Every Homeowner Should Know
You don’t need a plumber for every water-related problem. When you are helping with some repairs at home, knowing a few basic plumbing repair tips can save you hundreds of dollars.
Unclogging a Drain

Most clogged drains come down to hair, grease, and soap buildup. Before reaching for harsh chemicals, try these gentler methods:
- Use a drain snake or zip-it tool to pull out the clog manually
- Pour baking soda followed by white vinegar down the drain, wait 15 minutes, then flush with hot water
- Use a plunger — yes, even for sink drains (block the overflow hole first)
Chemical drain cleaners work, but they can damage pipes over time. Use them sparingly.
Replacing a Toilet Flapper
A running toilet is almost always caused by a worn toilet flapper valve. This is a super common bathroom repair that anyone can do.
- Turn off the water supply (valve behind the toilet)
- Flush to empty the tank
- Unhook the old flapper from the ears on the overflow tube
- Snap on the new flapper and reconnect the chain
- Turn the water back on and test
Flappers cost about $5–$10 and are available at any hardware store.
Helpful Home Repair Reference Table
| Repair Type | Difficulty Level | Tools Needed | Avg. Time | DIY or Call a Pro? |
|---|---|---|---|---|
| Patching small wall holes | Easy | Spackle, putty knife, sandpaper | 30–60 min | DIY |
| Fixing a leaky faucet | Easy–Medium | Wrench, replacement parts | 45–90 min | DIY |
| Unclogging a drain | Easy | Drain snake, plunger | 15–30 min | DIY |
| Replacing toilet flapper | Easy | New flapper | 20–30 min | DIY |
| Fixing squeaky floors | Easy–Medium | Screws, graphite powder | 30–60 min | DIY |
| Replacing light switch | Medium | Screwdrivers, voltage tester | 30–45 min | DIY (with care) |
| Repairing drywall (large) | Medium | Drywall kit, joint compound | 2–4 hours | DIY or Pro |
| Fixing electrical wiring | Hard | Specialized tools, knowledge | Varies | Call a Pro |
Basic Electrical Repairs (Know Your Limits)

When you are helping with some repairs at home, electrical work is where you need to be careful. Some tasks are fine for beginners — others should always go to a licensed electrician.
What You Can Safely DIY
- Replacing a light switch or outlet (always turn off the breaker first)
- Changing a light fixture
- Resetting a tripped circuit breaker
- Replacing a GFCI outlet in bathrooms or kitchens
What You Should Leave to the Pros
- Anything involving your electrical panel
- Running new wiring through walls
- Installing heavy appliances that need dedicated circuits
- Any repair where you’re unsure what wires are which
Always use a non-contact voltage tester before touching any wires. They cost about $15 and could literally save your life.
Home Repair Safety Tips You Shouldn’t Skip
Safety comes first — always. When you are helping with some repairs at home, it’s easy to rush through a job and forget the basics.
Always follow these safety rules:
- Turn off power before any electrical work — not just the switch, but the circuit breaker
- Shut off water at the source before any plumbing repair
- Wear safety glasses when drilling, cutting, or working overhead
- Use a proper ladder — never stand on a chair or bucket
- Keep a first aid kit nearby
- Read product labels on all chemical products before use
- Don’t work alone on jobs that involve heights or live electricity
Also — know when to stop. If a repair feels beyond your skill level, it probably is. Calling a professional isn’t a failure. It’s a smart move.
Building Good Repair Habits for the Long Term
The best way to keep home repair costs low is to stay ahead of problems. Small issues ignored for months tend to become big, expensive fixes.
Simple Maintenance Checklist

Every month:
- Check under sinks for leaks
- Test smoke and CO detectors
- Clean the lint trap in your dryer
Every 3–6 months:
- Inspect caulking around tubs, sinks, and windows
- Check door and window seals for drafts
- Look for hairline cracks in walls or ceilings
Once a year:
- HVAC filter replacement
- Clean gutters
- Inspect the roof and attic if safe to do so
- Check your water heater for signs of rust or sediment
When you are helping with some repairs at home on a regular schedule, you’ll rarely face a major surprise.
Frequently Asked Questions (FAQs)
Q1: How do I know when a repair is too big for me to handle myself? A good rule of thumb — if the repair involves your home’s main electrical panel, structural walls, gas lines, or major plumbing (like replacing pipes), call a licensed professional. For everything else, try it yourself but stop if you feel unsure. There’s no shame in asking for help. Safety always comes before saving money.
Q2: What’s the most important tool when you are helping with some repairs at home? Honestly, a good cordless drill changes everything. It handles screws, drilling holes, assembling furniture, and mounting shelves. Combined with a set of drill bits and screwdriver attachments, it covers about 60% of common home repair needs. If you’re only buying one tool, make it this one.
Q3: Can I fix a leaking pipe myself? For minor leaks at joints or connections, yes — you can often use plumber’s tape (Teflon tape) or a pipe repair clamp as a temporary fix. But if the pipe itself is cracked or the leak is significant, call a plumber. Water damage spreads fast and gets expensive quickly.
Q4: How do I match paint when patching a wall? Take a chip of your existing paint (or the paint can lid if you still have it) to a paint store or hardware store. They can color-match it using a spectrophotometer. It’s usually free or very cheap. Even with a perfect match, freshly painted spots may look slightly different until they fully cure — usually 2–4 weeks.
Q5: Is it safe to do electrical repairs if I have no experience? Replacing an outlet or light switch is manageable for most careful beginners, as long as you turn off the circuit breaker, use a voltage tester to confirm the power is off, and follow the wiring diagram carefully. Anything more complex — like rewiring or working near the panel — should go to a licensed electrician.
Conclusion: Start Small, Build Confidence
The first time you are helping with some repairs at home, it might feel a little intimidating. That’s normal. Every experienced DIYer started by patching their first hole or fixing their first leaky faucet.
Start with small, low-risk jobs. Build your tool kit gradually. Learn to recognize what you can handle and when to call for help. Over time, you are helping with some repairs at home becomes second nature — and genuinely enjoyable.
Your home is one of your biggest investments. Taking care of it yourself isn’t just practical. It’s empowering.


